
服务热线:013857763287
公告:

地点:浙江省温州市永嘉县瓯北街道和一村
电话:0577-67985330
电话:0577-67951353
手机:013857763287
传真:0577-67985332
邮编:3325105
邮箱:ck-v@163.com
When reassembling, follow the reverse steps of disassembly and install each component in turn.

Pay attention to the following when tightening the barrel head bolts:
1. It must be a high-quality bolt with strength grade of 12.9, and the thread surface of the bolt shall be evenly coated with heat-resistant grease (such as MoS2, etc.).
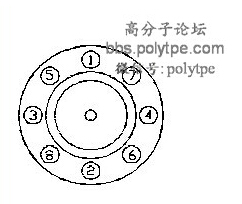
2. Tighten the diagonal bolts evenly and tighten them several times each in the order shown in Figure 10-5.
3. Use appropriate torque. Torque wrench is preferred.
4. Finally tighten all bolts.
5. If the bolt of the heating barrel head is tightened too tightly, it may cause screw failure
The grain is damaged, but if it is too loose, it may leak material.
One、Preparation before disassembly
1. Before disassembly, the mold shall be removed first, the mold shall be opened to the maximum, the mold shall be adjusted to the maximum, and the screw can be taken out from the mold opening area.
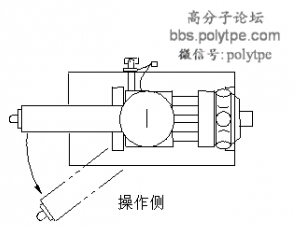
(the injection seat can also be adjusted obliquely, as shown in Figure 10-6.)
2. Resins such as polycarbonate (PC) and rigid polyvinyl chloride (PVC) will stick to the screw and heating barrel during cooling. Polycarbonate, in particular, will damage the metal surface if it is not carefully peeled off. If these resins are used, they should be cleaned with polystyrene (PS), polyethylene (PE) and other cleaning materials to facilitate the cleaning and disassembly of the screw( It refers to injecting polystyrene into the air for several times)
3. Empty the raw materials in the barrel and keep the barrel temperature. The temperature of the front barrel can be appropriately increased to facilitate the removal of the screws of the front barrel.
4. Prepare 4 or 5 wooden or steel rods (diameter < diameter of screw) ×( Length < injection process), used to eject the screw.
5. Waste cotton wadding or rags
Two、displacement
1. Mainframe
Step 1: use the selector switch of the injection molding device to move the injection molding device backward until it cannot be moved.
Step 2: remove the fastening bolts of the guide rod support.
Step 3: remove the cylindrical pin connecting the integral shift cylinder and the front plate of the shooting table to separate them.
Step 4: use the special oil cylinder installed on the non operator side and on the table of the injection machine body to push the injection seat to rotate towards the operator, which can meet the smooth exit of the screw and barrel. Pay attention not to tighten the wires and hoses too tightly.
Operation process:
(1) Select 50% system pressure and 30% system flow through the operation panel.
(2) Remove the protective cover of the control valve installed next to the special oil cylinder.
(3) Push the handle forward by hand, the oil cylinder will slowly push the injection seat, rotate towards the operator until it is in a proper position, and then return the handle to the middle position.
(4) When the injection seat needs to be returned, pull the handle back.
2. Medium sized machine
Step 1: same as mainframe.
Step 2: remove the adjusting seat block at the horizontal position of the nozzle and the fastening bolts of the guide rod support.
Step 3: remove the cylindrical pin connecting the integral cylinder and the front plate of the shooting table to separate them.
Step 4: select 50% system pressure and 30% system flow through the operation panel, press the seat back button, and use the full shift oil cylinder to rotate the injection seat to the appropriate position towards the operation side.
Three、Disassembly
Step 1: heat the temperature of the heating barrel to close to the melting temperature of the resin, and then disconnect the power supply of the heater.
Step 2: lower the injection speed and injection pressure; Adjust the injection speed and pressure with multi-stage injection function to close to 0.
Step 3: return the screw (injection piston) to the original position at full stroke.
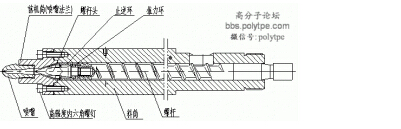
Step 4: as shown in Figure 10-9, remove the barrel head and nozzle.
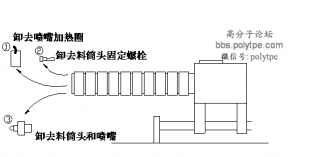
Step 5: the sequence is shown in Figure 10-8. Remove other parts connected with the screw, and place the screw fixing ring bolt and other bolts separately to avoid confusion.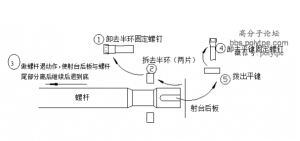
Four、Remove the screw
Step 1: take a section of wood rod with an outer diameter slightly less than the diameter and length of the screw, and place the end face of the screw tail and the shoot
Between the back plates of the table, hold the wood with clamps (not hands), as shown in Figure 10-9
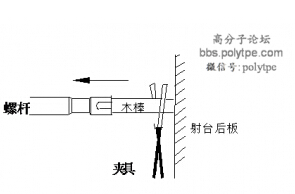
Step 2: jog the injection action key to push the screw forward and remove the fixture at the same time.
Step 3: after the injection moves forward the whole process, jog the ejection withdrawal action to return the rear plate of the ejection table to the whole process.
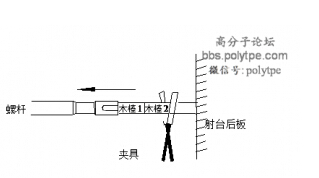
Step 4: pad the second wooden stick. Repeat steps 1 to 3, as shown in Figure 10-10.
If the screw is overheated, do not touch the die with bare hands. After about 1 / 2 of the length of the large screw is jacked out, it shall be fastened with a lifting rope and the hook shall be good to make the screw leave the cylinder safely.
Step 7: the screw should be placed on a wooden block or frame to prevent damage. When placed for a long time, it shall be hung vertically to prevent bending and deformation.
Five、Remove the cartridge
Step 1: remove all electric heating rings of the heating barrel, and remove the hot wire support if necessary.
Step 2: unscrew the large nut that fixes the barrel to the front plate of the shooting table.
Step 3: hang the barrel, as shown in Figure 10-11.
Step 4: jog the screw back action key to return the rear plate of the shooting table in the whole process.
Step 5: as shown in Figure 10-11, insert a wooden rod between the rear plate of the shooting table and the rear end of the barrel, clamp the wooden rod with a clamp, and do not use your hand to prevent danger.
Step 6: use low injection speed and pressure to generate injection action and push the barrel forward.
Step 7: after the barrel moves forward in the whole process, jog the ejection and retraction action to retract the rear plate of the ejection table in the whole process again.
Step 8: repeat steps 5 to 7.
Hanging diagram of material barrel
Step 9: after nearly half of the matching length of the barrel is pushed out of the front plate of the shooting table, the lifting height should be adjusted slightly.
Step 10: repeat steps 5 to 7 to separate the heating cylinder from the injection seat. At this time, pay special attention that the charging cylinder should not be cold.
Step 11: after the heating barrel is removed, it should be placed in a place where the next work will not be disturbed.
Installation precautions
1. Evenly apply heat-resistant grease (such as MoS2) to the thread of the bolt and the rib surface of the screw head to prevent high temperature rust.
2. Confirmation of screw model.
3. Pay attention to the direction when installing the check ring. The direction with double chamfering (large chamfering) should be towards the screw, so as to feed during material storage.
4. Pay attention to the fit clearance between the check ring and the material barrel. Grind the check ring to a clearance 0.08-0.10mm smaller than the material barrel.
5. Note that the tightening direction of screw head is counterclockwise( Anti rib)
6. The screws of the front barrel must be tightened symmetrically and evenly.
7. The barrel cooling system shall be cleaned to ensure smoothness. Pay attention to the correct use of raw material belt and wrap it around the process plug.
8. Install the water inlet and outlet connector and conduct water pressure test. There is no water leakage at the pressure of 0.8MPa.
9. Precautions for installation of heating ring:
A. The wire core is not exposed
B. The plastic skin is not compressed
C. The porcelain joint screw is not high and flat
D. The installation direction of electric heating ring is generally about 45 degrees downward
E. Pay attention to the arrangement of heating rings and do not interfere with the protective cover
F. Tighten the screws.
[上一条]:没有了!